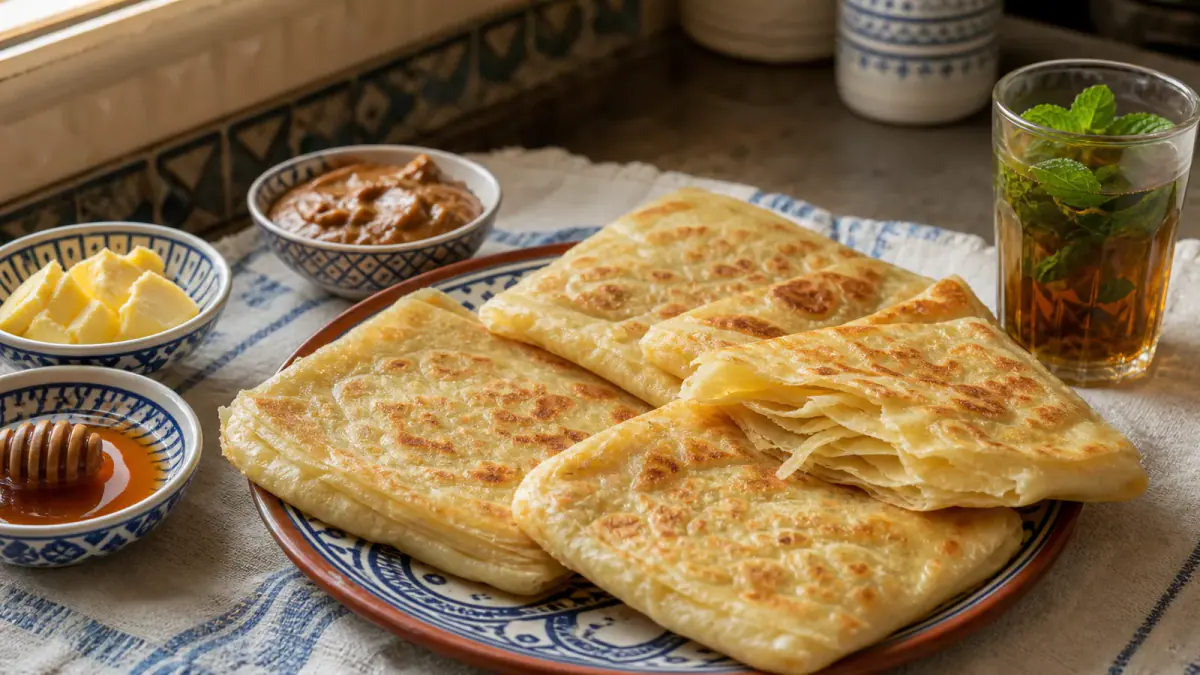
Msemen is a square Moroccan flatbread with a crisp, browned surface and thin, chewy layers inside. The layers come from stretching a soft dough until almost translucent, brushing it with fat, dusting it with fine semolina and folding it into a square before griddle cooking.
This msemen recipe is deliberately yeast-free and uses weights for consistency. It makes eight medium pieces with all-purpose flour, fine semolina, water and salt; oil and butter separate the folds. Resting—not extra flour—is what makes the dough easy to stretch.
Allow about two hours from mixing to the first cooked msemen, including mostly hands-off resting time. Read the folding section once before beginning and keep the work surface generously oiled.
Msemen recipe at a glance
| Detail | Plan |
|---|---|
| Yield | 8 medium msemen |
| Active work | About 45 minutes |
| Resting | 45–60 minutes total |
| Cooking | About 25 minutes, depending on pan size |
| Dough style | Soft, elastic and yeast-free |
| Best served | Warm from the griddle |
Times are guides, not guarantees. Flour absorption, room temperature and kneading method change how quickly the dough relaxes.
What is msemen?
Msemen—also spelled msemmen, msammen or rghaif in different contexts—is a laminated North African flatbread. “Laminated” means that thin dough is folded with fat between the layers. Unlike croissant dough, the butter is not enclosed as a cold block; oil, softened or melted butter and semolina are spread directly over a stretched sheet.
It is often described in English as a Moroccan pancake, but “flatbread” explains the texture more accurately. Msemen is griddled, not poured as batter. It can be eaten at breakfast, with afternoon tea, as a street snack or torn into dishes such as rfissa.
Morocco’s National Tourist Office describes bread as a staple accompanying traditional meals and identifies msemen as the flaky bread used beneath rfissa. Its official food-and-drink guide gives useful cultural context, although household msemen formulas vary.
Ingredients
For the dough
- 300 g all-purpose flour, plus none for stretching
- 200 g fine semolina, not coarse couscous
- 8 g fine salt
- 300 g lukewarm water to start
- up to 25 g additional water, added only if needed
- 1 tablespoon neutral oil for coating the dough balls
For laminating and cooking
- 80 ml neutral vegetable oil
- 45 g unsalted butter, melted and cooled until warm
- 60 g fine semolina
- a little additional oil for the work surface and griddle
Useful equipment
- digital kitchen scale
- large mixing bowl or stand mixer
- wide smooth tray
- broad, clean work surface
- heavy skillet, cast-iron pan or flat griddle
- flexible spatula
- clean kitchen towel
The recipe contains gluten and dairy. For a dairy-free version, replace the butter with more neutral oil. The flavor changes slightly, but the folding method remains the same.
Why use flour and semolina?
All-purpose flour supplies stretch, while fine semolina adds flavor, color and a gently granular structure between the folds. A dough made entirely from coarse semolina would be difficult to stretch this way.
Use fine semolina or durum flour intended for bread and pastry. Couscous grains are much larger and are not a substitute. Brands absorb water differently, which is why the final 25 g of water is optional.
The dough should feel softer than an ordinary sandwich-bread dough. It may be tacky during the first minutes of kneading, but it should become smooth and elastic rather than wet enough to flow.
Step 1: Mix the dough
- Combine the all-purpose flour, 200 g fine semolina and salt in a large bowl.
- Pour in 300 g lukewarm water while mixing with your hand or the lowest mixer speed.
- Squeeze and fold until no dry flour remains.
- If the dough feels firm or cracks when pressed, add the remaining water 5 g at a time. Stop when it is soft and slightly tacky.
- Cover and leave it for 10 minutes before full kneading.
That short pause lets the flour hydrate. It can turn a rough mass into a more cooperative dough without adding oil or extra water too quickly.
Do not use hot water. It can make the outside gummy and does not replace proper kneading or rest.
Step 2: Knead until smooth and elastic
Knead by hand for roughly 10–15 minutes, or with a dough hook on low to medium-low speed for roughly 8–10 minutes. These times are only starting points; judge the dough.
It is ready when:
- the surface looks smoother;
- it stretches several centimeters before tearing;
- a pressed fingertip slowly springs back;
- it feels supple rather than stiff;
- there are no dry semolina pockets.
If it sticks lightly, oil your hands instead of adding flour. Extra flour makes the final msemen denser and fights the thin stretching needed for layers.
If the dough resists every movement, cover it for another 10 minutes, then continue. Rest is part of gluten development.
Step 3: Divide and rest the dough balls
Lightly oil a tray and your hands. Divide the dough into eight equal portions—about 100 g each, depending on the final water amount.
Shape each piece into a smooth ball by drawing the edges underneath. Coat every ball lightly with oil and place it seam-side down with space between portions. Cover well so the surfaces do not dry.
Rest for 30–45 minutes. In a cool room or with strong flour, the dough may need longer. The balls should spread slightly and flatten without immediately springing back.
A dry skin will tear during stretching. Use a tray lid, reusable cover or clean towel topped with a light sheet of food-safe wrap when the air is dry.
Step 4: Prepare the lamination mixture
Stir the neutral oil and melted butter together in a small bowl. Put the 60 g fine semolina in a second bowl. Oil the work surface generously but avoid a deep puddle.
Keep everything within reach before touching a dough ball. Once stretched thin, the sheet is awkward to abandon while searching for butter.
For dairy-free msemen, use about 120 ml neutral oil in total and omit the butter. You may not need all of it; the surface and dough should stay lubricated without dripping.
Step 5: Stretch and fold each msemen
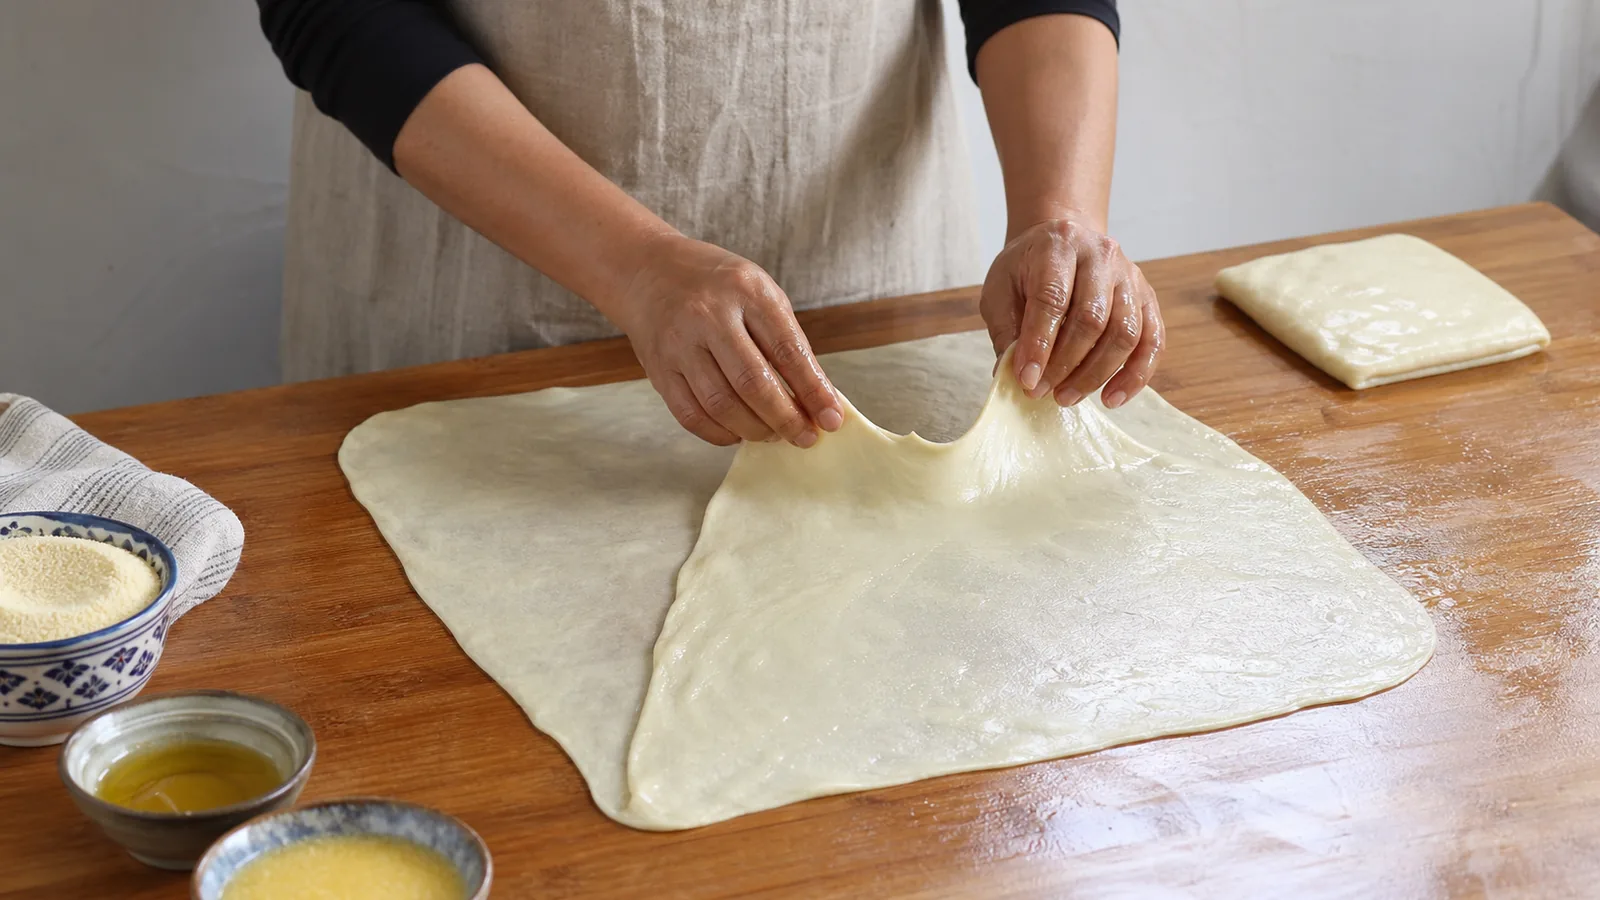
Work with one rested ball at a time and keep the others covered.
- Place a dough ball on the oiled surface and flatten it gently with oiled fingertips.
- Press outward from the center, then lift and ease the edges until the sheet is extremely thin. Aim for roughly 35–40 cm across, but prioritize thinness over a perfect measurement.
- Small holes near an edge are acceptable. Stop and rest the sheet briefly if it keeps shrinking.
- Brush a thin film of the oil-butter mixture over the whole surface.
- Sprinkle about 1–2 teaspoons of fine semolina evenly over the sheet.
- Fold the left third toward the center, then fold the right third over it to make a long rectangle.
- Brush and dust the exposed surface lightly again.
- Fold the bottom third upward, then the top third down to form a compact square.
- Place seam-side down on an oiled tray and cover.
Repeat with all eight balls. Work in the order they were shaped so each gets the longest possible rest.
The sheet does not need to be geometrically perfect. Thin, even stretching and a clear layer of fat matter more than straight edges.
Step 6: Rest the folded squares
Leave the folded squares covered for 10–15 minutes before cooking. This second rest prevents them from snapping back when flattened.
Do not stack raw squares; their oiled surfaces can merge. If the kitchen is warm, check the earliest pieces rather than leaving them for an hour. This yeast-free dough will not rise dramatically, but the fat can soften and leak.
Step 7: Flatten and griddle
Heat a heavy pan or griddle over medium heat. It should be hot enough to brown the bread gradually, not smoke.
Take the first folded square and press it outward on the oiled surface until it is approximately 18–20 cm wide and 4–5 mm thick. Keep the square shape without crushing every layer.
Transfer it to the pan:
- Cook the first side until golden patches form and the surface begins to look set.
- Turn it and cook the second side.
- Continue turning every 30–60 seconds so the center cooks before either face burns.
- Press only obvious thick corners gently with the spatula; do not flatten the entire bread repeatedly.
Total time is commonly several minutes per piece, but the pan, thickness and heat source matter more than a stopwatch. A properly cooked msemen has deep golden spots, crisp edges and no raw dough line when torn.
Wipe away burnt semolina between batches and add only a light film of oil when the pan looks dry.
How to know msemen is cooked
Use three checks:
- Color: both sides have an irregular golden-brown pattern rather than one black patch.
- Structure: the square feels set and flexible, not floppy with a heavy raw center.
- Interior: a torn edge shows distinct thin layers without wet dough.
If the outside darkens before the center sets, lower the heat. If the bread dries out before coloring, the pan may be too cool or the square too thin.
Place cooked pieces on a rack or a towel-lined basket. Avoid sealing them in plastic while hot, because trapped steam softens the crisp exterior.
The five most common msemen problems
The dough keeps tearing
The dough may be too dry, insufficiently kneaded or under-rested. Cover it for another 10–15 minutes and oil your hands. Do not repair a tight dough by pulling harder.
A few tiny edge holes are normal. Large tears across the center mean the sheet needs more relaxation or strength.
The dough springs back
It has not rested long enough. Return the ball or folded square to the tray, cover it and work on another portion. Resting is more effective than forcing it into size.
The msemen is dense instead of layered
Likely causes include a thick initial sheet, too little fat between folds, no semolina dusting, or aggressive pressing after folding. Stretch the first sheet until the work surface is almost visible through it.
The outside burns while the middle stays raw
The pan is too hot or the square is too thick. Reduce heat, turn more frequently and flatten the next piece more evenly.
The bread is greasy
The surface needs lubrication, but the dough should not swim in oil. Brush a thin coat inside the folds and use only enough pan oil to prevent sticking. Rest cooked pieces on a rack instead of piling them immediately.
How to serve msemen in Morocco
Serve msemen warm, whole or quartered, with one or more of:
- honey and butter;
- amlou;
- olive oil;
- soft cheese;
- jam;
- eggs and olives;
- Moroccan mint tea.
A Moroccan tourism gastronomy guide describes amlou as a southern specialty made from argan oil, honey and almonds. The official gastronomy page associates it particularly with the Agadir region. Nut-allergy warnings matter: amlou is not simply chocolate spread and normally contains almonds.
The tourism office’s English gastronomy brochure places msemen within a Moroccan breakfast and emphasizes sharing even modest meals. See the official Moroccan gastronomy brochure for that wider food context.
For tea technique, use our Moroccan mint tea guide rather than boiling mint and sugar directly into every pot.
Msemen versus baghrir, harcha and meloui
These breakfast breads are not interchangeable:
| Bread | Shape and method | Texture |
|---|---|---|
| Msemen | Thin dough folded into a square and griddled | Layered, chewy and crisp-edged |
| Baghrir | Yeasted semolina batter cooked on one side | Soft with many small holes |
| Harcha | Semolina dough shaped into a round and griddled | Crumbly and biscuit-like |
| Meloui | Laminated dough rolled or coiled before flattening | Circular, layered and spiral-structured |
English menus may call several of them “Moroccan pancakes.” Ask by name when you want a specific texture.
Sweet and savory variations
Master plain msemen before adding a filling. A filling makes the sheet heavier, increases the risk of tearing and may require gentler heat.
Common savory directions use onion, herbs, spices, pepper or minced meat. Keep fillings cooked or finely cut as appropriate, cooled and relatively dry before folding. Wet filling steams the layers and can leak into the pan.
For a sweet serving, add toppings after cooking rather than folding large amounts of honey into raw dough. Honey in the pan can burn.
Rfissa uses torn or layered flatbread beneath chicken, lentils, fenugreek and broth. Our traditional Moroccan dishes guide explains where msemen fits among everyday and celebration foods.
Make-ahead, freezing and reheating
Msemen is best shortly after cooking, but both raw folded squares and cooked pieces can be managed ahead.
To prepare the same day
Fold the squares, cover them individually on an oiled tray and cook within a reasonable same-day window. If holding them longer, refrigerate promptly rather than leaving buttered dough in a warm kitchen.
To refrigerate cooked msemen
Cool completely, separate pieces with parchment and seal them. Refrigerate promptly and use within a few days. Reheat in a dry or very lightly oiled pan over medium-low heat, turning until the layers soften and the surface becomes lightly crisp.
To freeze
Cool cooked msemen completely. Place parchment between pieces, wrap well and freeze flat. Reheat from frozen over lower heat, or thaw in the refrigerator first. Avoid a hot oven for too long; it can dry the thin layers.
Do not freeze a warm stack. Condensation becomes ice and damages the texture.
Can you make msemen without yeast?
Yes. This recipe contains no yeast. Gluten development, thin stretching, fat and folding create the structure; steam and small air pockets help separate the layers during cooking.
Some family recipes add a small amount of yeast, sugar or baking powder. Those formulas are not “wrong,” but they produce a somewhat softer or puffier result and require their own timing. Do not add yeast to this recipe without adjusting the process.
Can you make msemen with cups?
A scale gives the most repeatable result because flour and semolina pack differently in cups. If cups are your only option, spoon dry ingredients lightly into the cup and level them rather than compressing them.
Water should still be added gradually. The target is a very soft, elastic dough, so a visual and tactile check remains necessary even with weights.
Frequently asked questions
Is msemen the same as roti or paratha?
No. They share the broad idea of layered griddled flatbread, but the dough ratios, folding, cultural setting and serving traditions differ. Msemen should be named and understood as a Moroccan and North African bread.
Why is my msemen not square?
The initial sheet or letter folds were uneven. Shape matters less than thin, consistent layers. With practice, begin from a more even circle or rectangle and align each third before the final fold.
Can I use coarse semolina?
Coarse semolina can tear the sheet and create hard grains between layers. Use fine semolina or durum flour intended for bread and pastry.
Can I use only oil?
Yes. Replace the butter with neutral oil for a dairy-free version. Butter contributes flavor and browning, but oil alone can still separate the layers.
Where can I try msemen in Morocco?
Breakfast counters, bakeries, markets, tea shops and guesthouses commonly serve it. Look for active griddles and fresh turnover. In the Souss region, try it with amlou; our Agadir travel guide explains the regional setting.
Final checklist
Successful msemen depends on a short list of controls:
- weigh the flour and fine semolina;
- keep the dough soft;
- knead until elastic;
- oil rather than flour the work surface;
- protect every dough ball from drying;
- rest before stretching and again after folding;
- stretch the first sheet almost translucent;
- use a thin film of fat and a light semolina dusting;
- cook over steady medium heat;
- turn repeatedly until the center is done.
The folding becomes quicker after the first few pieces. Patience during rest and moderate heat during cooking matter more than perfect geometry.
For the wider role of bread, breakfast and shared food in Morocco, continue with our Moroccan food guide.